Overview
Of the content in this list, I have been most involved in out of bounds work. Almost all of the content in this section was at least partly discovered by me.
Techniques
1. Tree Climbing
2. glitch climbing
3. floor clipping
4. corner climbing
5. Campfire abuse
6. wall misalignments
7. recentering
8. climbing spot levitation
1.Tree Climbing
due to the shape of certain trees around the map, it is possible to 'climb' on top of trees. The reason to do this is as a map escape, if a tree is particularly large, and/or an invisible wall is particularly short, you can jump over the invisible wall and escape the map like that.
Step 1: walk next to the tree normally, right next to it.
Step 2: lean your head, or walk in real life inside of the tree. Do not use your in-game movement with your controller until you reach the top.
Step 3: You will begin levitating or 'climbing' up the tree. In order to climb higher, you must move in real life in the correct direction. You can remember which direction you need to move from mussle memory, or you can stick your hands in front of you, you will be able to feel the hitbox of the tree.
2.Glitch Climbing
Glitch climbing is a broader form of tree climbing. Depending on the angle of a wall, you can stick your head inside of it and begin moving up. It is mostly usefull as a thing to test when exploring new areas, and then memorize that route, not as a quick and easy way of moving. The general advice I give people:
push your head as far into the wall as possible, to gain more height
have your character's movement face into the wall to fall less often
3.Floor Clipping
floor clipping is very simple. Whenever you have an object, such as a chair, or a very low ceiling, you can crouch under the ceiling, and when you stand up the game will make you fall through the floor. This effect depends heavily on not only what object you use to try to clip through the floor, but also on the exact shape of the floor. The reason this is very usefull for escaping the map is because typically the mountains that surround the player dip under the ground, and can be walked on. If an invisible wall is preventing the player from leaving the map, you can do a floor clip to 'tunnel' under the wall and escape. The following is a side view of a few different situations in game. The red oval represents the player's hitbox at different points in time, the black lines represent geometry the player can stand on/walk into.
------------------------------------------------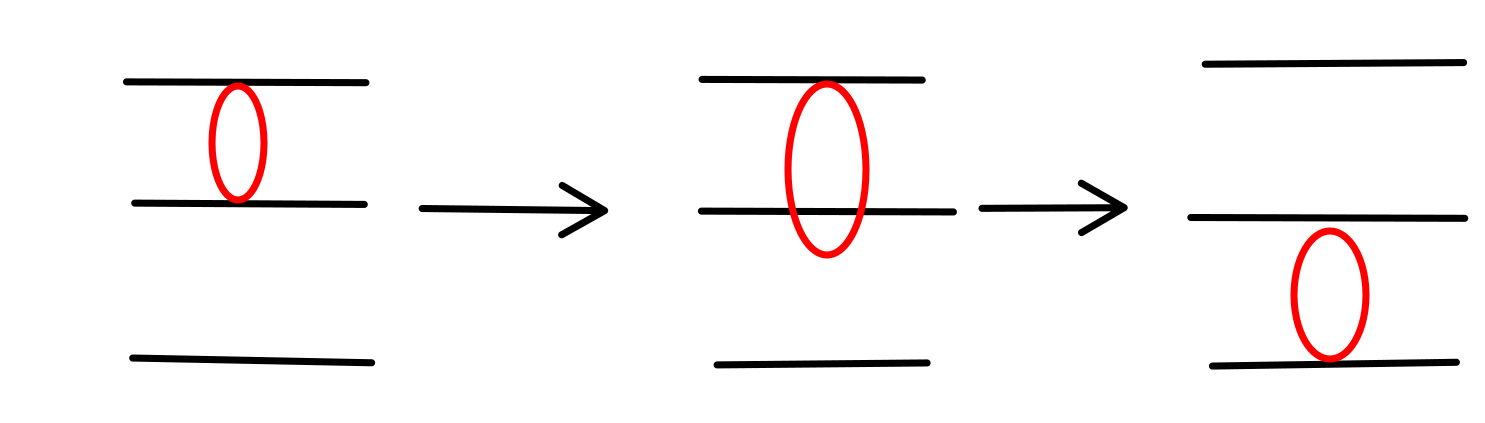
This image represents one case that a floor clip is possible, a flat floor and ceiling.
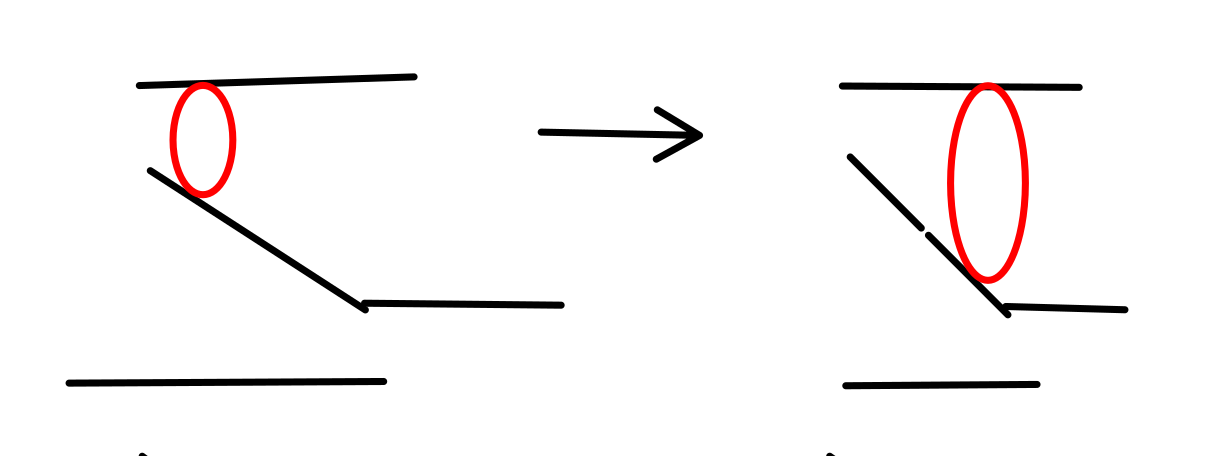
In this instance, because the floor is at an off angle, standing up causes the player to go down the floor, rather than clipping through the floor.
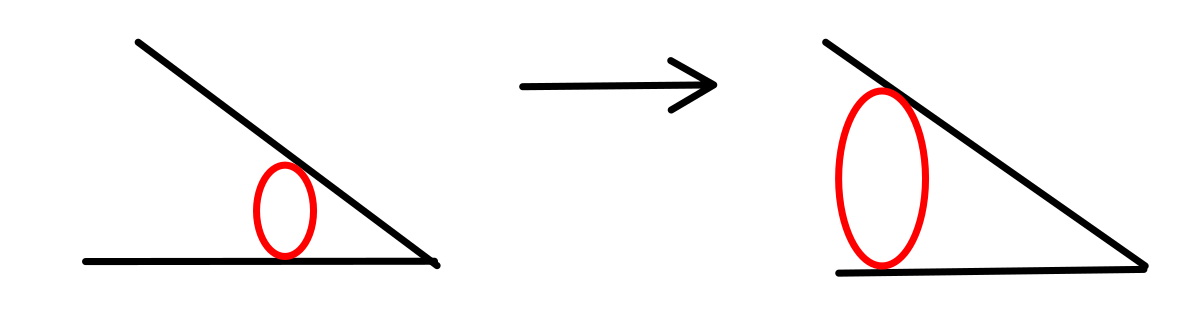
This is another way floor clipping can fail, if the cieling is angled, then the player will move in the direction of the slope, rather than going through the floor.
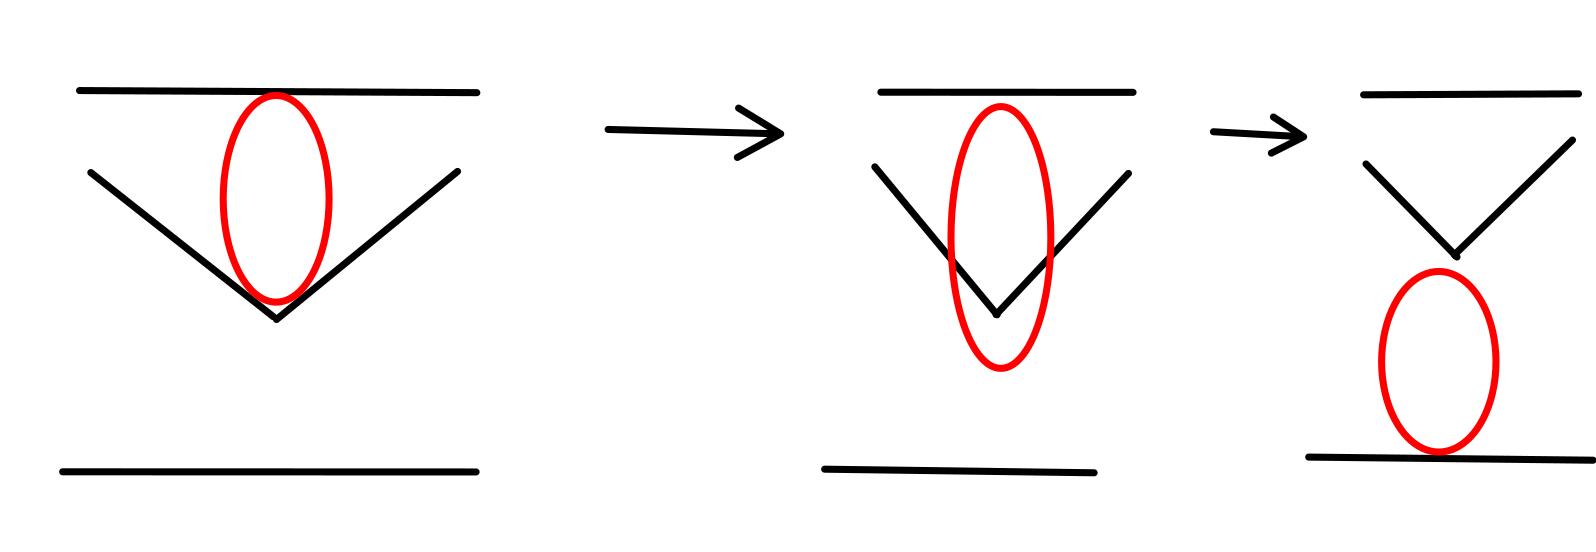
Not all sloped floors/cielings are failures. If the game can not move the player away for any reason, it will always force the player to fall before making them clip through a wall.
------------------------------------------------4.corner climbing
Corner climbing is when you have the corner between 2 walls, each of which you can walk along as described before. Simaler to glitch climbing, you can put your head into the wall, and when you cross the corner to transfer over to walking on the second wall, the corner will give you a bump up the wall a few inches. This glitch may be used as a last resort, nearly exclusively for out of bounds movement.
5.campfire abuse
Campfire abuse is used for when you have already gotten out of bounds by some other means, and need to get to another place out of bounds. Below is a few diagrams depicting the way campfires are placed in the game. The Blue circle represents the player's position (note, the game scans starting from the player's head position). The left view shows the situation from the side, and the right is a top down perspective. The green rectangle on the right represents the fact that that area is a place the game allows campfires to be placed, a red rectangle represents a place the game doesnt want campfires to be placed.
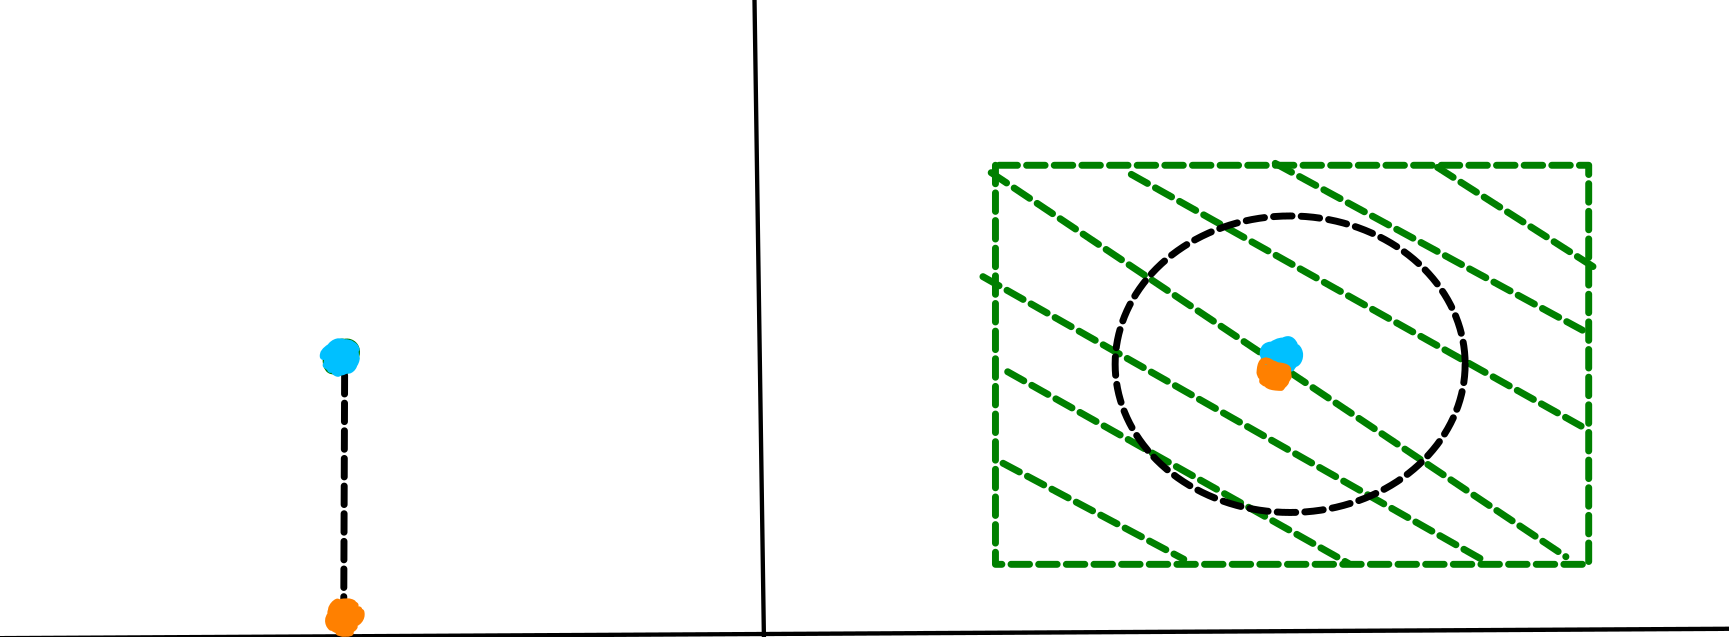
This represents what usually happens during gameplay. The next image is what it looks like when a campfire is placed out of bounds, but within the sphere the game scans for valid ground.
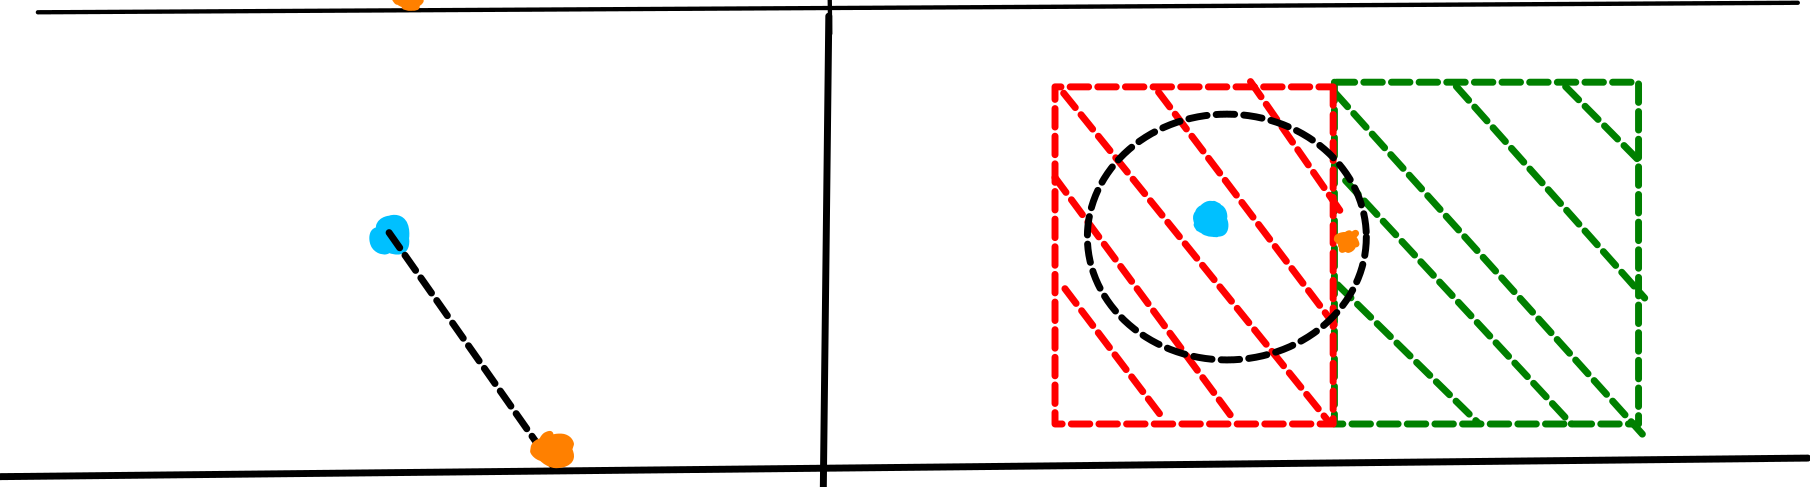
As you can see, this situation begins to look interesting. The campfire got displaced due to the fact the ground the player is directly standing on is not valid. Now, the exploitable part comes next, what if there is no valid ground anywhere?
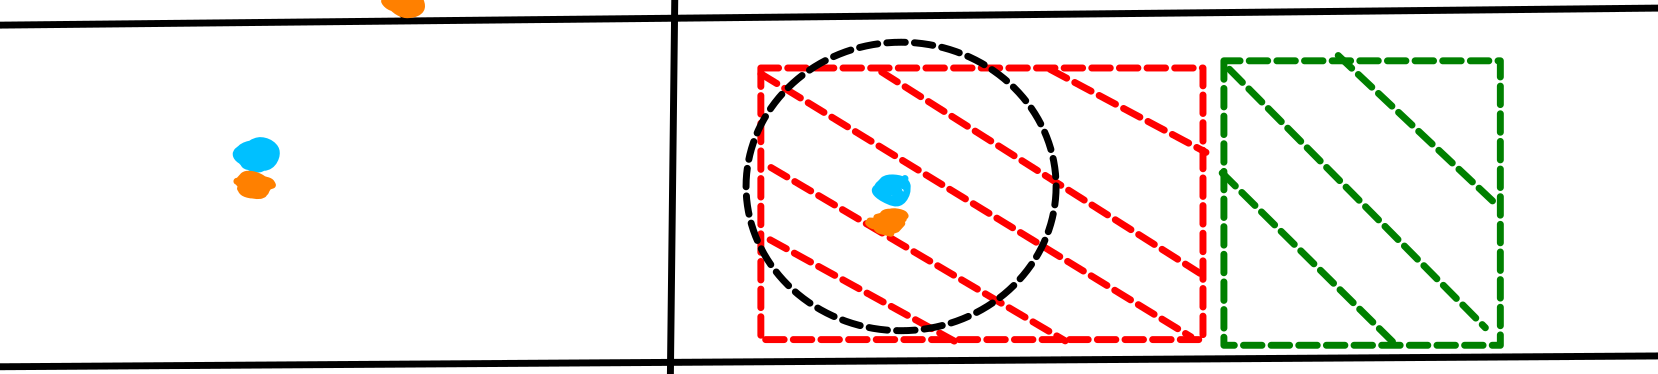
This begins to be exploitable. As long as there is no valid ground within the scanning radius, the campfire gets placed higher than it should be, and it will always be placed at the player's head. Below is one way to abuse this. The ramp on the right of each part of the diagram represents a steep mountain slope, that for the sake of demonstration cannot be climbed by any other method.
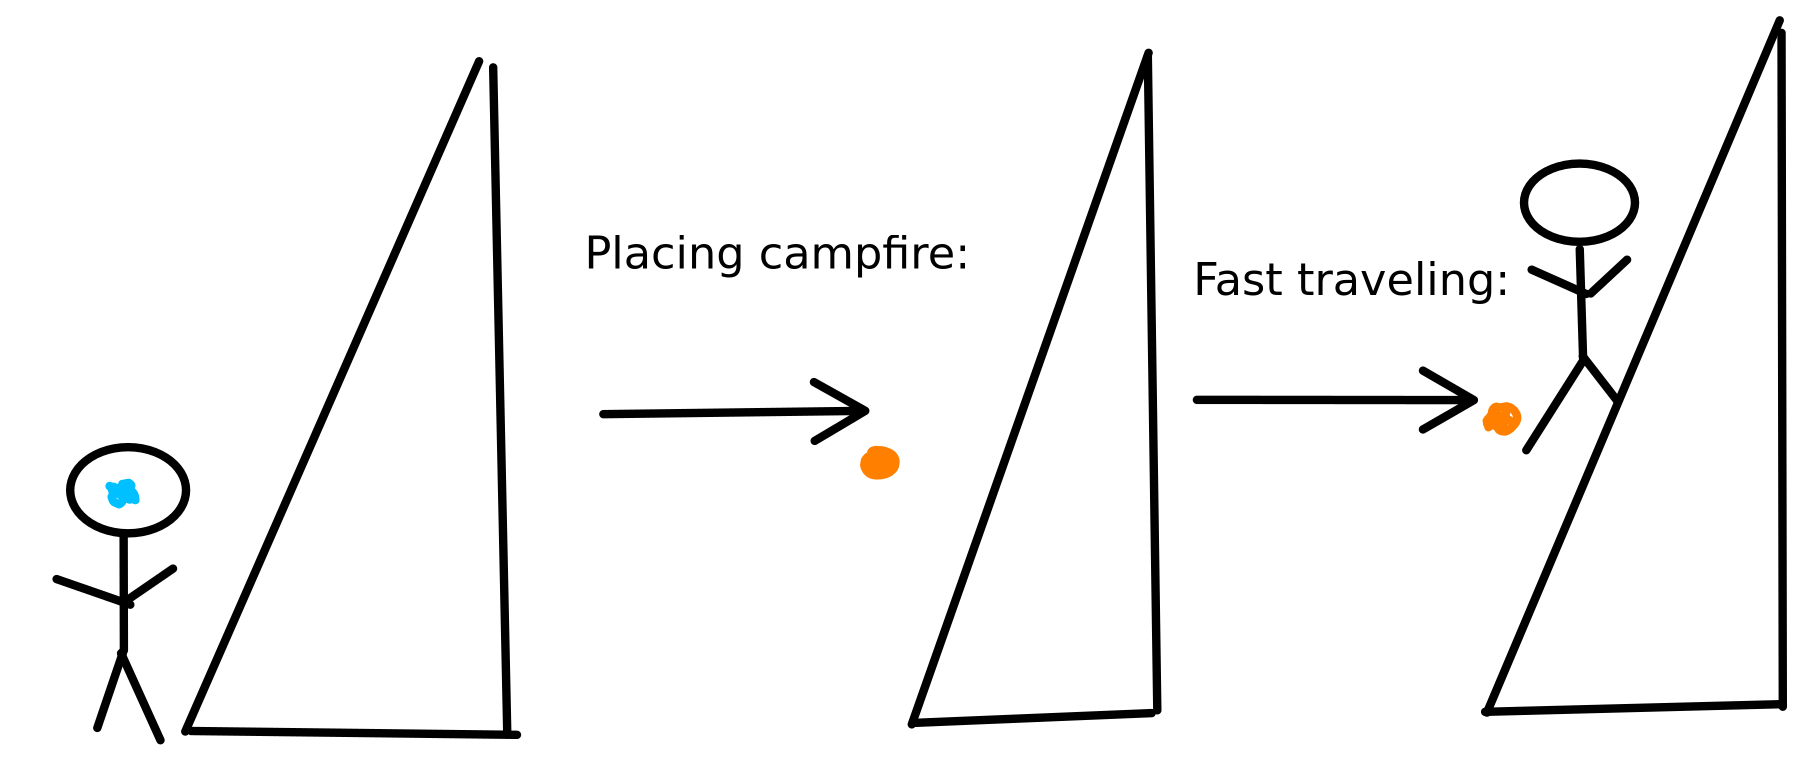
note: if the mountain was sloped the other way, doing this trick would not work because in the last panel, the player would get teleported up the vertical distance, but then not be able to stand on the wall. This trick can be done to scale an arbitrarily high wall.
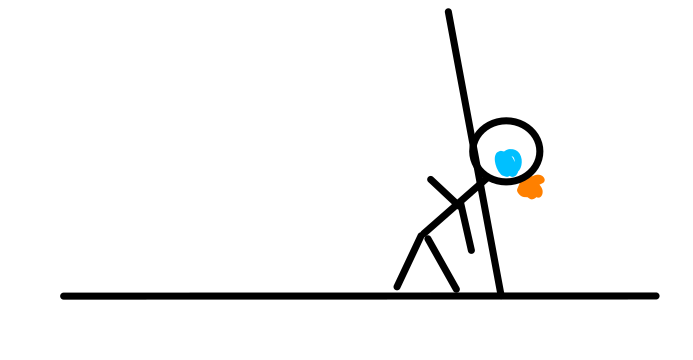
This is another way to abuse campfires. By forcing your head into the wall, while your player model will be stuck on the other side, your internal position is actually on the other side of the wall. If you are sufficiently out of bounds, the campfire will be placed on the other side. Fast traveling while the campfire is on the other side will completely bypass the wall
---------------------------------------------------------6. Wall misalignments
A wall misalignment is when valid ground (the green area in the campfire section) is out of bounds (where out of bounds is defined by the enclosed area of invisible walls). The first way will be an extension of campfire abuse.
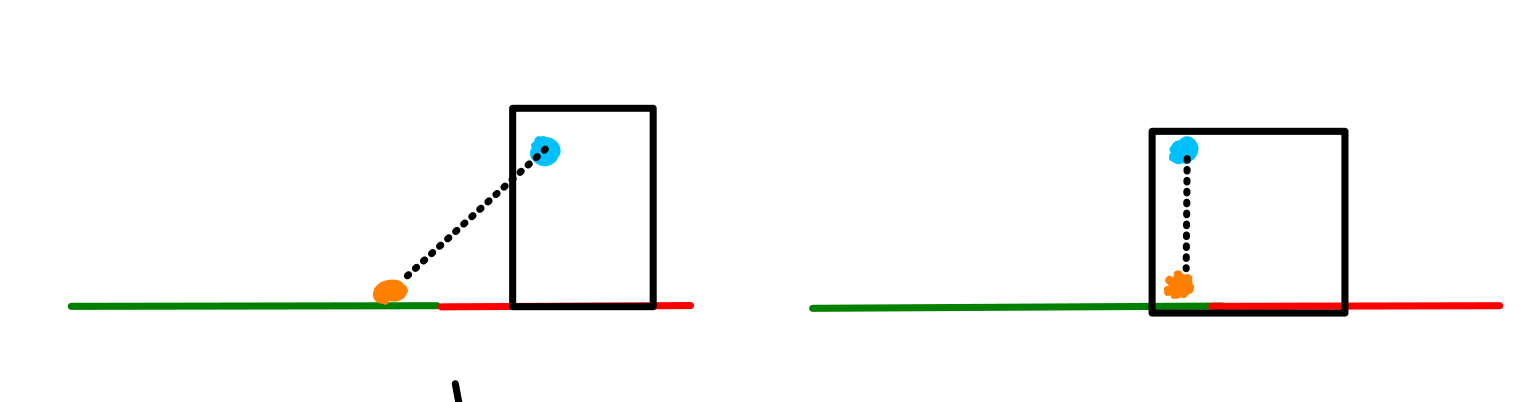
This represents the final way campfires can be abused. The black square represents an invisible wall, the blue circle represents the player's head/scanning origin position, and the orange circle represents the placed campfire's position. In the vast majority of cases, the left side of the image is what is in the game. The valid ground ends well before the wall starts, rendering it unexploitable. The right pannel is a situation sometimes found, where the valid ground extends into the wall, even though the wall is blocking it. You cannot walk through the wall, however, campfires will be placed in valid ground because they never thought to include a check to see if it is inside a wall. Fast traveling inside a wall will let you walk through it, however it behaves very oddly. So far there are no new areas unlocked by this type of clip, but it is possible one may be found. If you are intending to look for this, I recommend using the teleport option in settings, and teleporting as close to a candidate wall as possible. Without moving, switch to free movement (aka regular walking in game). If you can move even one millimeter closer to the wall, it is likely not able to be exploited.
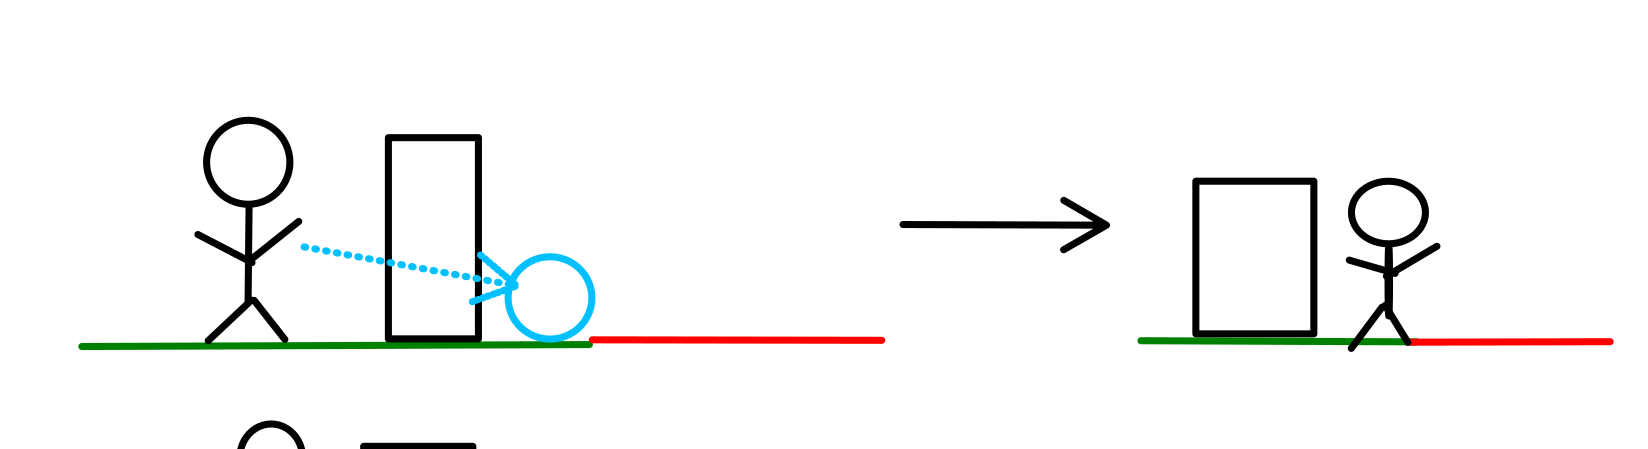
This image represents a second way of going through misalignments, teleportation. Using the in game movement option for teleportation has many uses. The most common one for our pourposes here is getting back in bounds. This is due to the fact teleportation lets you go through any obstruction, but with the catch the desination must both be: considered "valid ground" and "unobstructed". The stick figure represents the player, the green and red line represents the floor, green being valid and red being invalid. The blue circle represents the game checking that the destination is not inside a wall. If it is, the teleportation will not be carried out. If the misalignment is extreme (about a foot outside the invisible wall) then teleportation is an option to get through. You simply teleport to the other side of the wall, and then switch back to free movement to be out of bounds.
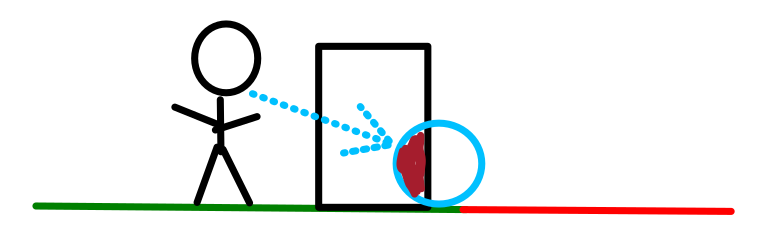
This image shows when there is not enough free area on the other side of the wall to be teleported to, in this case you must use campfires.
7.Recentering
recentering is a mildly usefull movement technique that lets you jump a short distance without losing height. I usually refer to this simply as a recenter, but you could also imagine it like a short dash through the air.
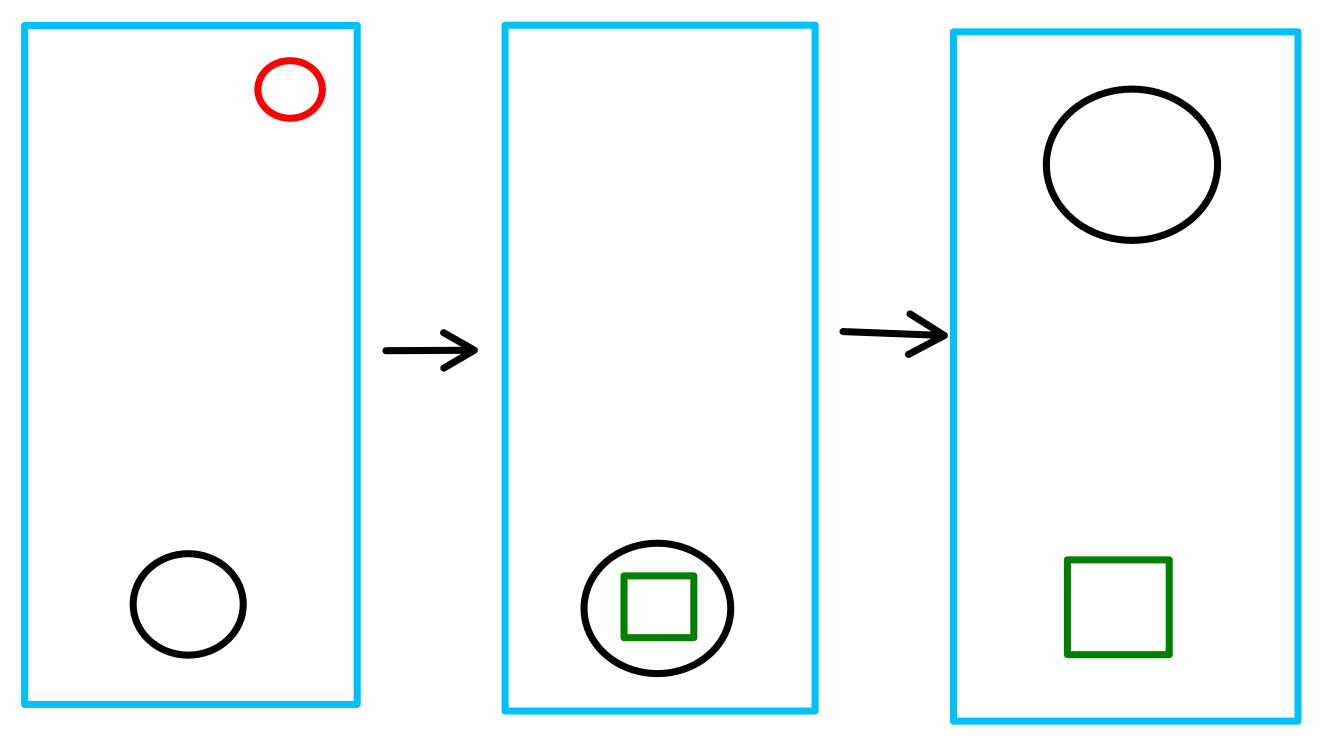
This image represents the physical room you are playing in, the blue square is the boundary set in your headset (you must have a large boundary to use this in most cases, i found about 8 feet is enough for most applications). The black square represents you, and the green square represents the center of your boundary. The first pannel shows the player performing a recenter at the edge of their boundary, this moves the center to that position. The third pannel represents the player moving in real life to the opposite end of their boundary. This causes the center to be disjointed from their IRL position.
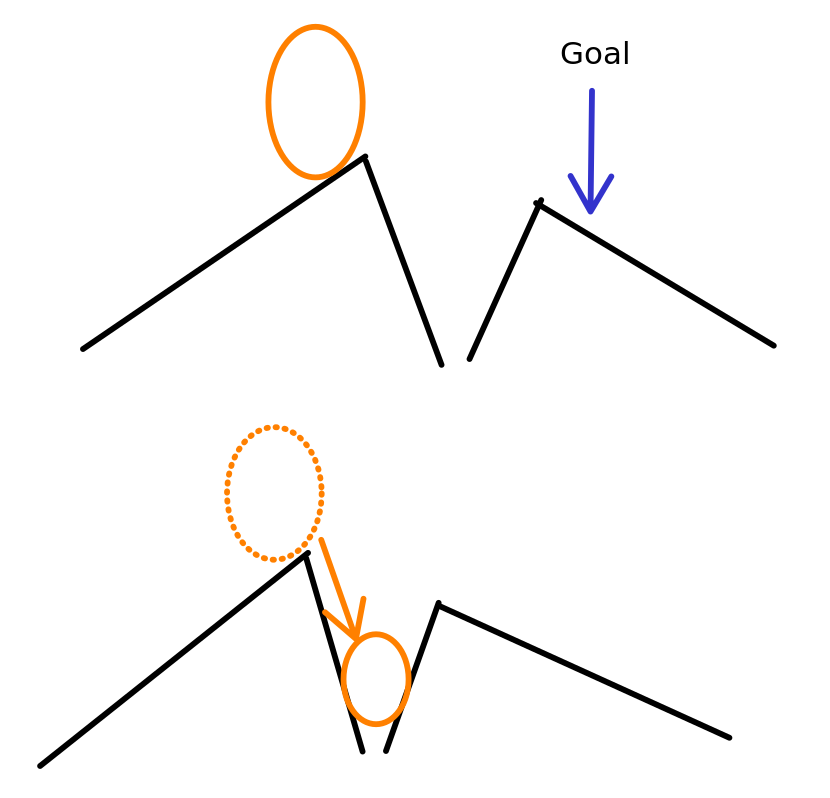
This image shows the problem we are trying to solve, showing what the player would see in-game. The orange circle is the player, and the black lines represent mountains or some other terrain. If the player tries walking straight forward, the slope is too steep to walk on regularly, and we will presume no other method can climb this wall. the player is on a higher mountain, so if you could somehow disable gravity, you would have the height to clear the gap. That is what recenter solves.
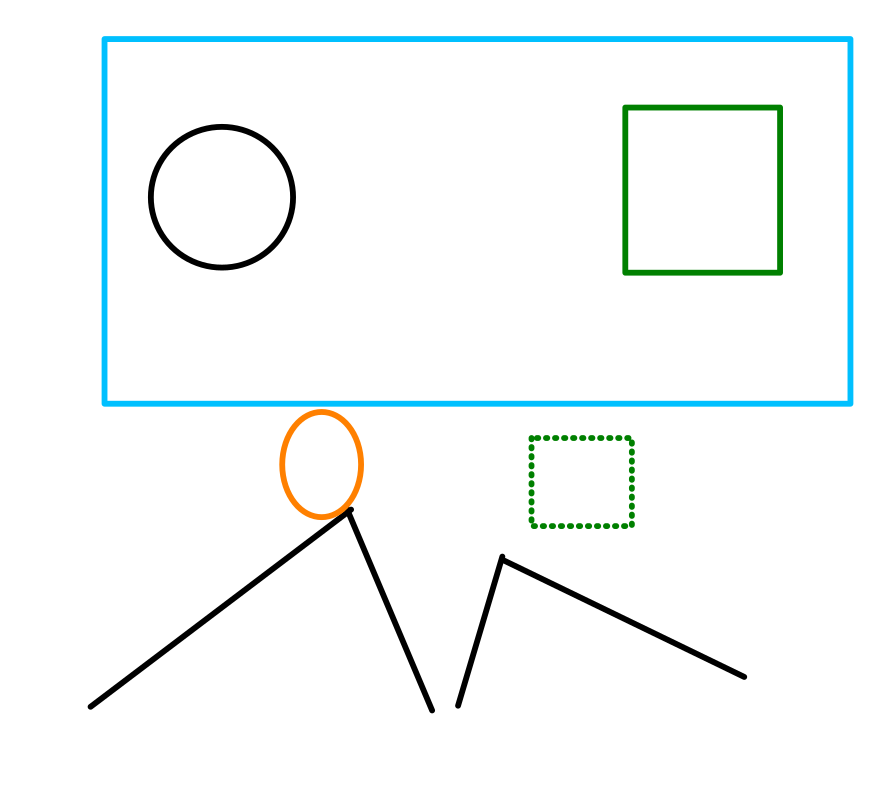
This image shows the irl view, displayed in the top diagram. the bottom shows the in game view, but with the center of the boundary overlayed on top of the game. This would not be seen by the player, which is why it is dotted. As you can see, the center of the player's boundary is over the terrain, meaning if you could go from the current position, and travel instantly to the other side, you could cross it.
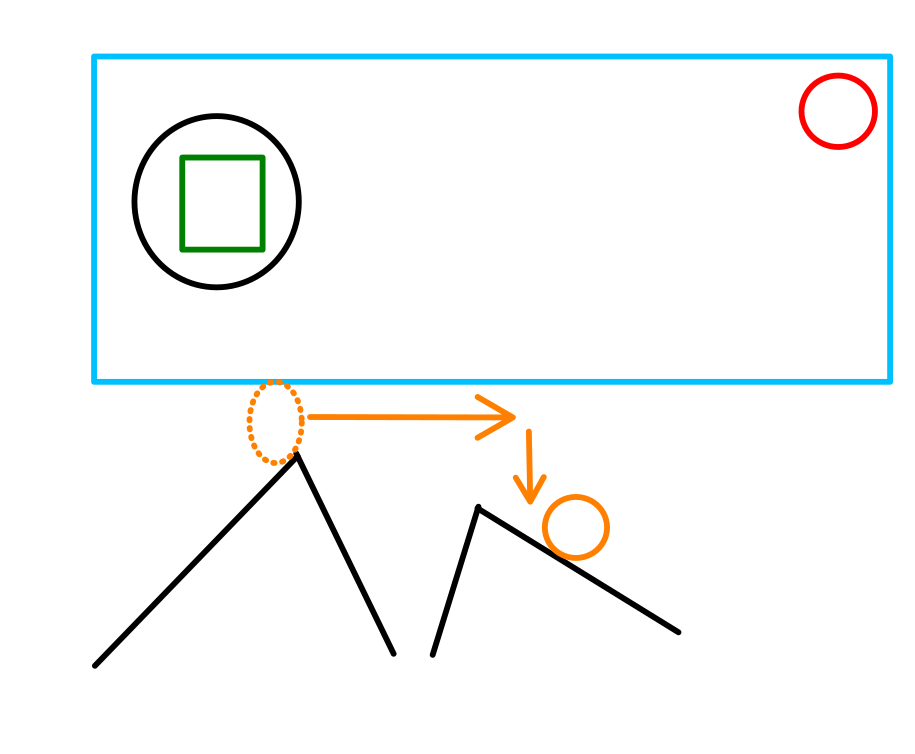
This image shows what would happen in the previous image if the player held down the menu button to do another recenter. In real life, the center of the boundary gets snapped back to your IRL position, but in game, the player gets teleported to the center's position. Note how I drew the arrows, even though you will end up on the other side of the mountain, on the ground, you do not go straight there. You will get instantaneously teleported directly horizontal, floating above the ground, and then gravity takes effect and you fall as normal.
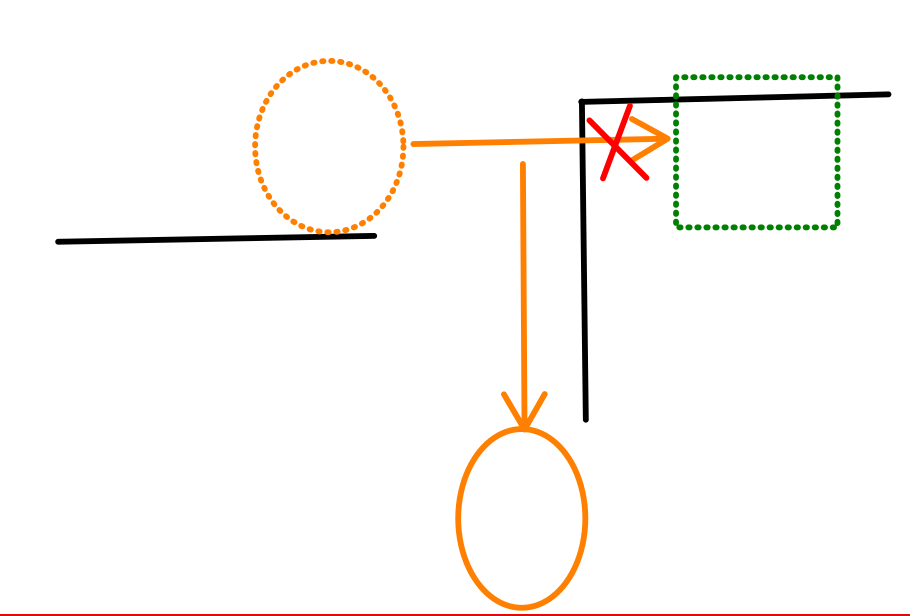
This image shows what happens when you are try to recenter into a wall. Your distance ends at the wall, and then you begin to fall down. If the wall were angled slightly, you could walk along the wall (in the direction of your screen). This is why it is helpfull to think of this as a dash rather than a teleport, the game does keep track of your original position and your ending position, and moves you between them 'continuously'
----------------------------------------------------8.Climbing spot levitation
This is the most recent discovery, responsible for 2 new out of bounds areas. There are multiple places in the game called 'climbing spots' where you can grab a piece of wood and use it to do intentional climbing. This feature could be a target for new glitches, as when you are holding onto the wood, you can manipulate your vertical position. Particularly, when you move your hand down while holding the wood, your body moves up which makes sense. However, if you are able to move your hand so far down, like below your floor, you can push your body arbitrarily high, as long as you can find a way to move your controllers that low. Here are a list of ways to move your controller's that low, in order of practicality.
1. recentering(again). Below is a picture of what typically happens when you recenter in game. The dotted lines represent the 3 spacial dimensions, the arrow head is the direction the player has recentered (important now that we care about the direction). The left hand image is a simple 3d drawing of a few balls placed in 3d space (meant to represent the in game world), and the right represents the player's boundary.
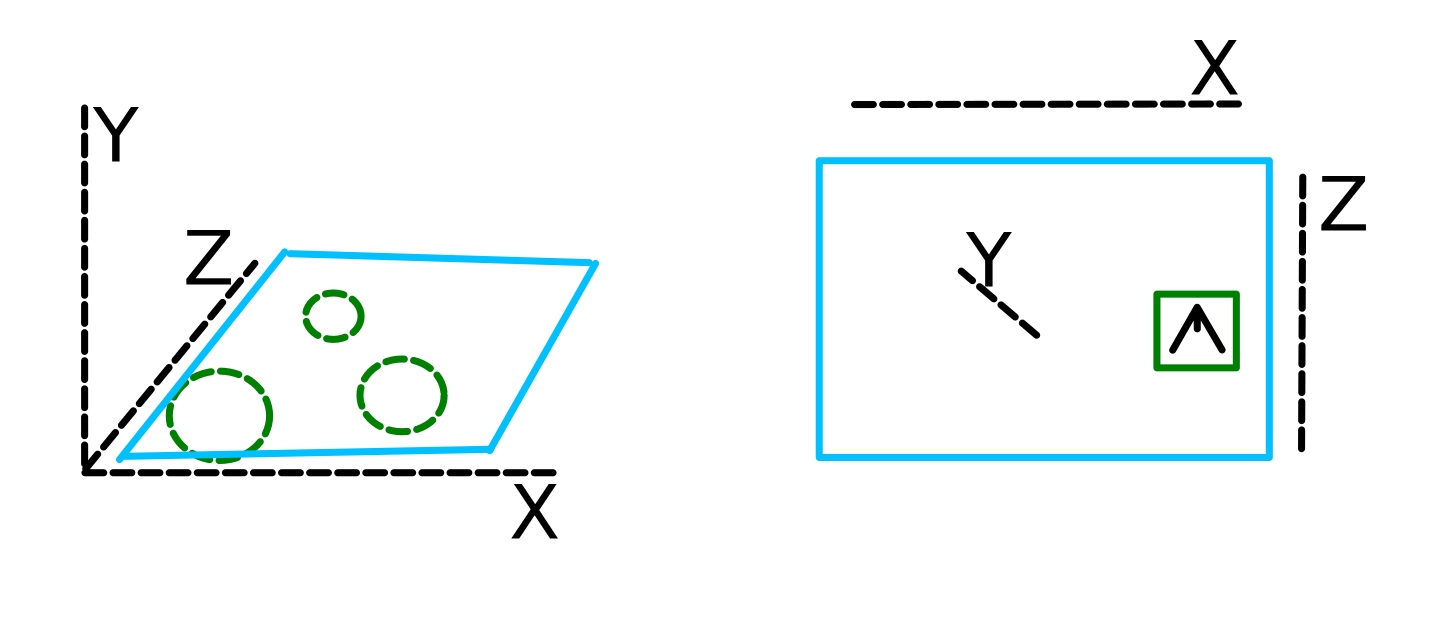
it is hard to make an insightful comment on an image, as it is rather obvious. The axis of your real life room match the game, you walk in your room and you move that distance in game. To exploit climbing spots using the boundary, you must go into your quest's settings, in the "experimental" category, you should find "play games while laying down" or something to a similar effect. turn it on, and either look straight up at the cieling, or look down on the floor, and initiate a recenter (i dont know if this works on pico or steam, I will not check). Rather than explain the barf inducing result, here is the picture. The player in this case has recented looking straight up (aka, it is in the computer, watching you right now)
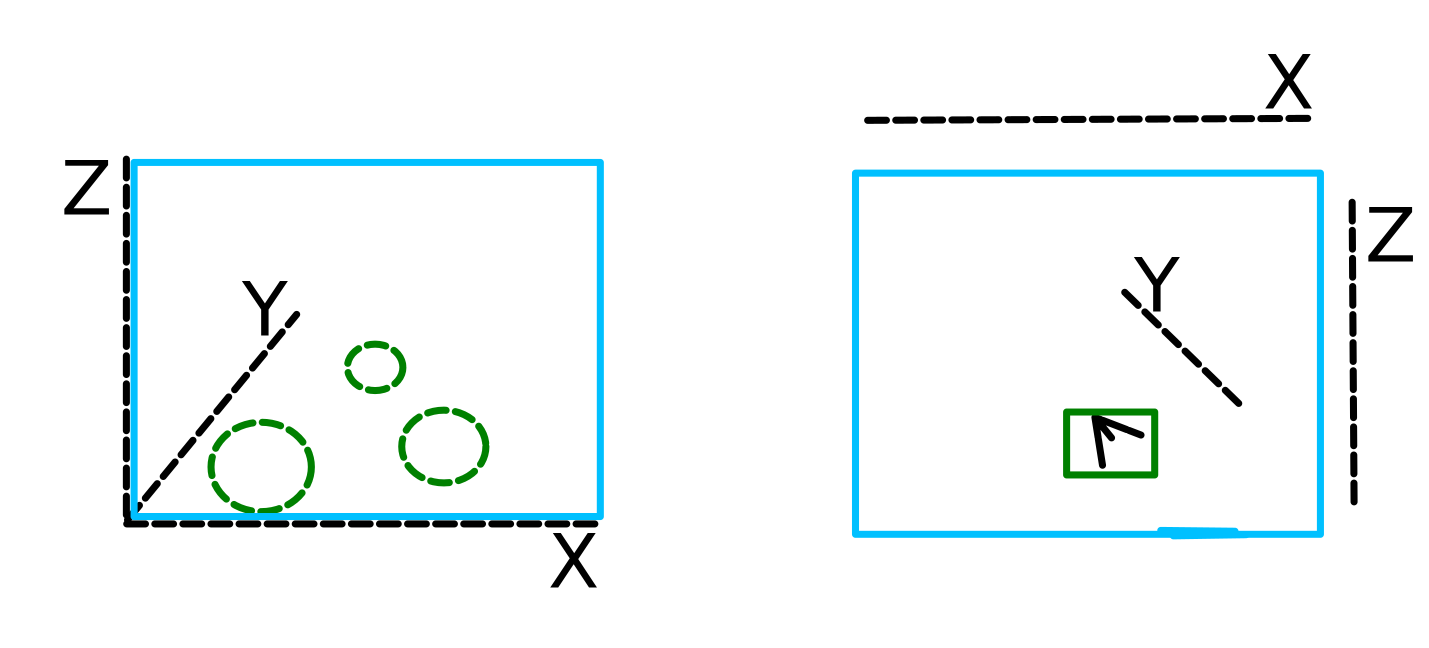
as you can see, the boundary of the player has been rotated 90 degrees to now be a wall. Assume the player is looking directly towards the wall labeled in the Z direction (to the right on your screen). if the player were to walk forwards, the would shift left and right in the game world on the left. However, now if they walk left and right, they would now be going along the z direction, meaning in game they would "walk" up. (they would not be "walking" or flying in game, they would get taller). Now, why is this usefull? By doing this, you could have say, a 30 foot long boundary point into the floor. And by walking in real life (therefore "crouching" very low) you would be moving your hand down. As mentioned before, this lets you float. Some key weaknesses to this technique are: 1. you must almost not move in the slightest (in the x and y direction in the last in game image) before the game forces you to stop climbing. this makes it hard even in "easy" cases. 2. you can climb really high, but only as high as your boundary is.
back to other ways to abuse climbing spots, #2 is quest 2 flying. I dont have a way to draw it, but basically the quest 2 has a plastic thing that goes around your hand while you play(look up an image if you want). if you give that a good slap, the quest 2 will bug, and send the controller flying the direction you hit it. For some reason, this lets you fly as far away in any direction. Downsides: its incredibly hard to control, it breaks our controllers probrobly, and it's a quest 2 only thing so I feel like it's cheating a bit.
the last way to abuse climbing spots could be to use a ladder in real life (please do not ever, 6 feet ladders are fatal) or set of stairs (also no pls). You could also use external programs, but that's pretty much just cheating. you may use these at your discretion, i am not responsible if you die or get a virus.
Out of bounds map
Below is a guide to every out of bounds map in mossy canyon. a couple things about this list:
1. it is not meant to document every square centimeter of the map. My criteria for including a spot is it has to be either exteremly useful for traversal, or unlock a fairly large section of the map.
2. the arrows represent each trick used to get out of bounds, referred to as a "map escape". The arrows are color coded. Green means easy to perform, orange means medium, and red means hard.
3. The highlighted sections of the map are meant to broadly represent the traversable area. This means that I will not describe how to get to specific areas, think of the arrows as the first step, and the highlighted region as a solution. it is up to you to get the steps in between, unless they are so fiendishly difficult that a full breakdown is warrented.
4. the areas are colored the easiest method to get to that place. if a red arrow is next to a green area, there is a green arrow that can take you there. The colors do not have any criteria, I based it off of my personal opinion (vibes).
I will try to include screenshots/videos to explain some of this, but for now I will include text to try to explain.
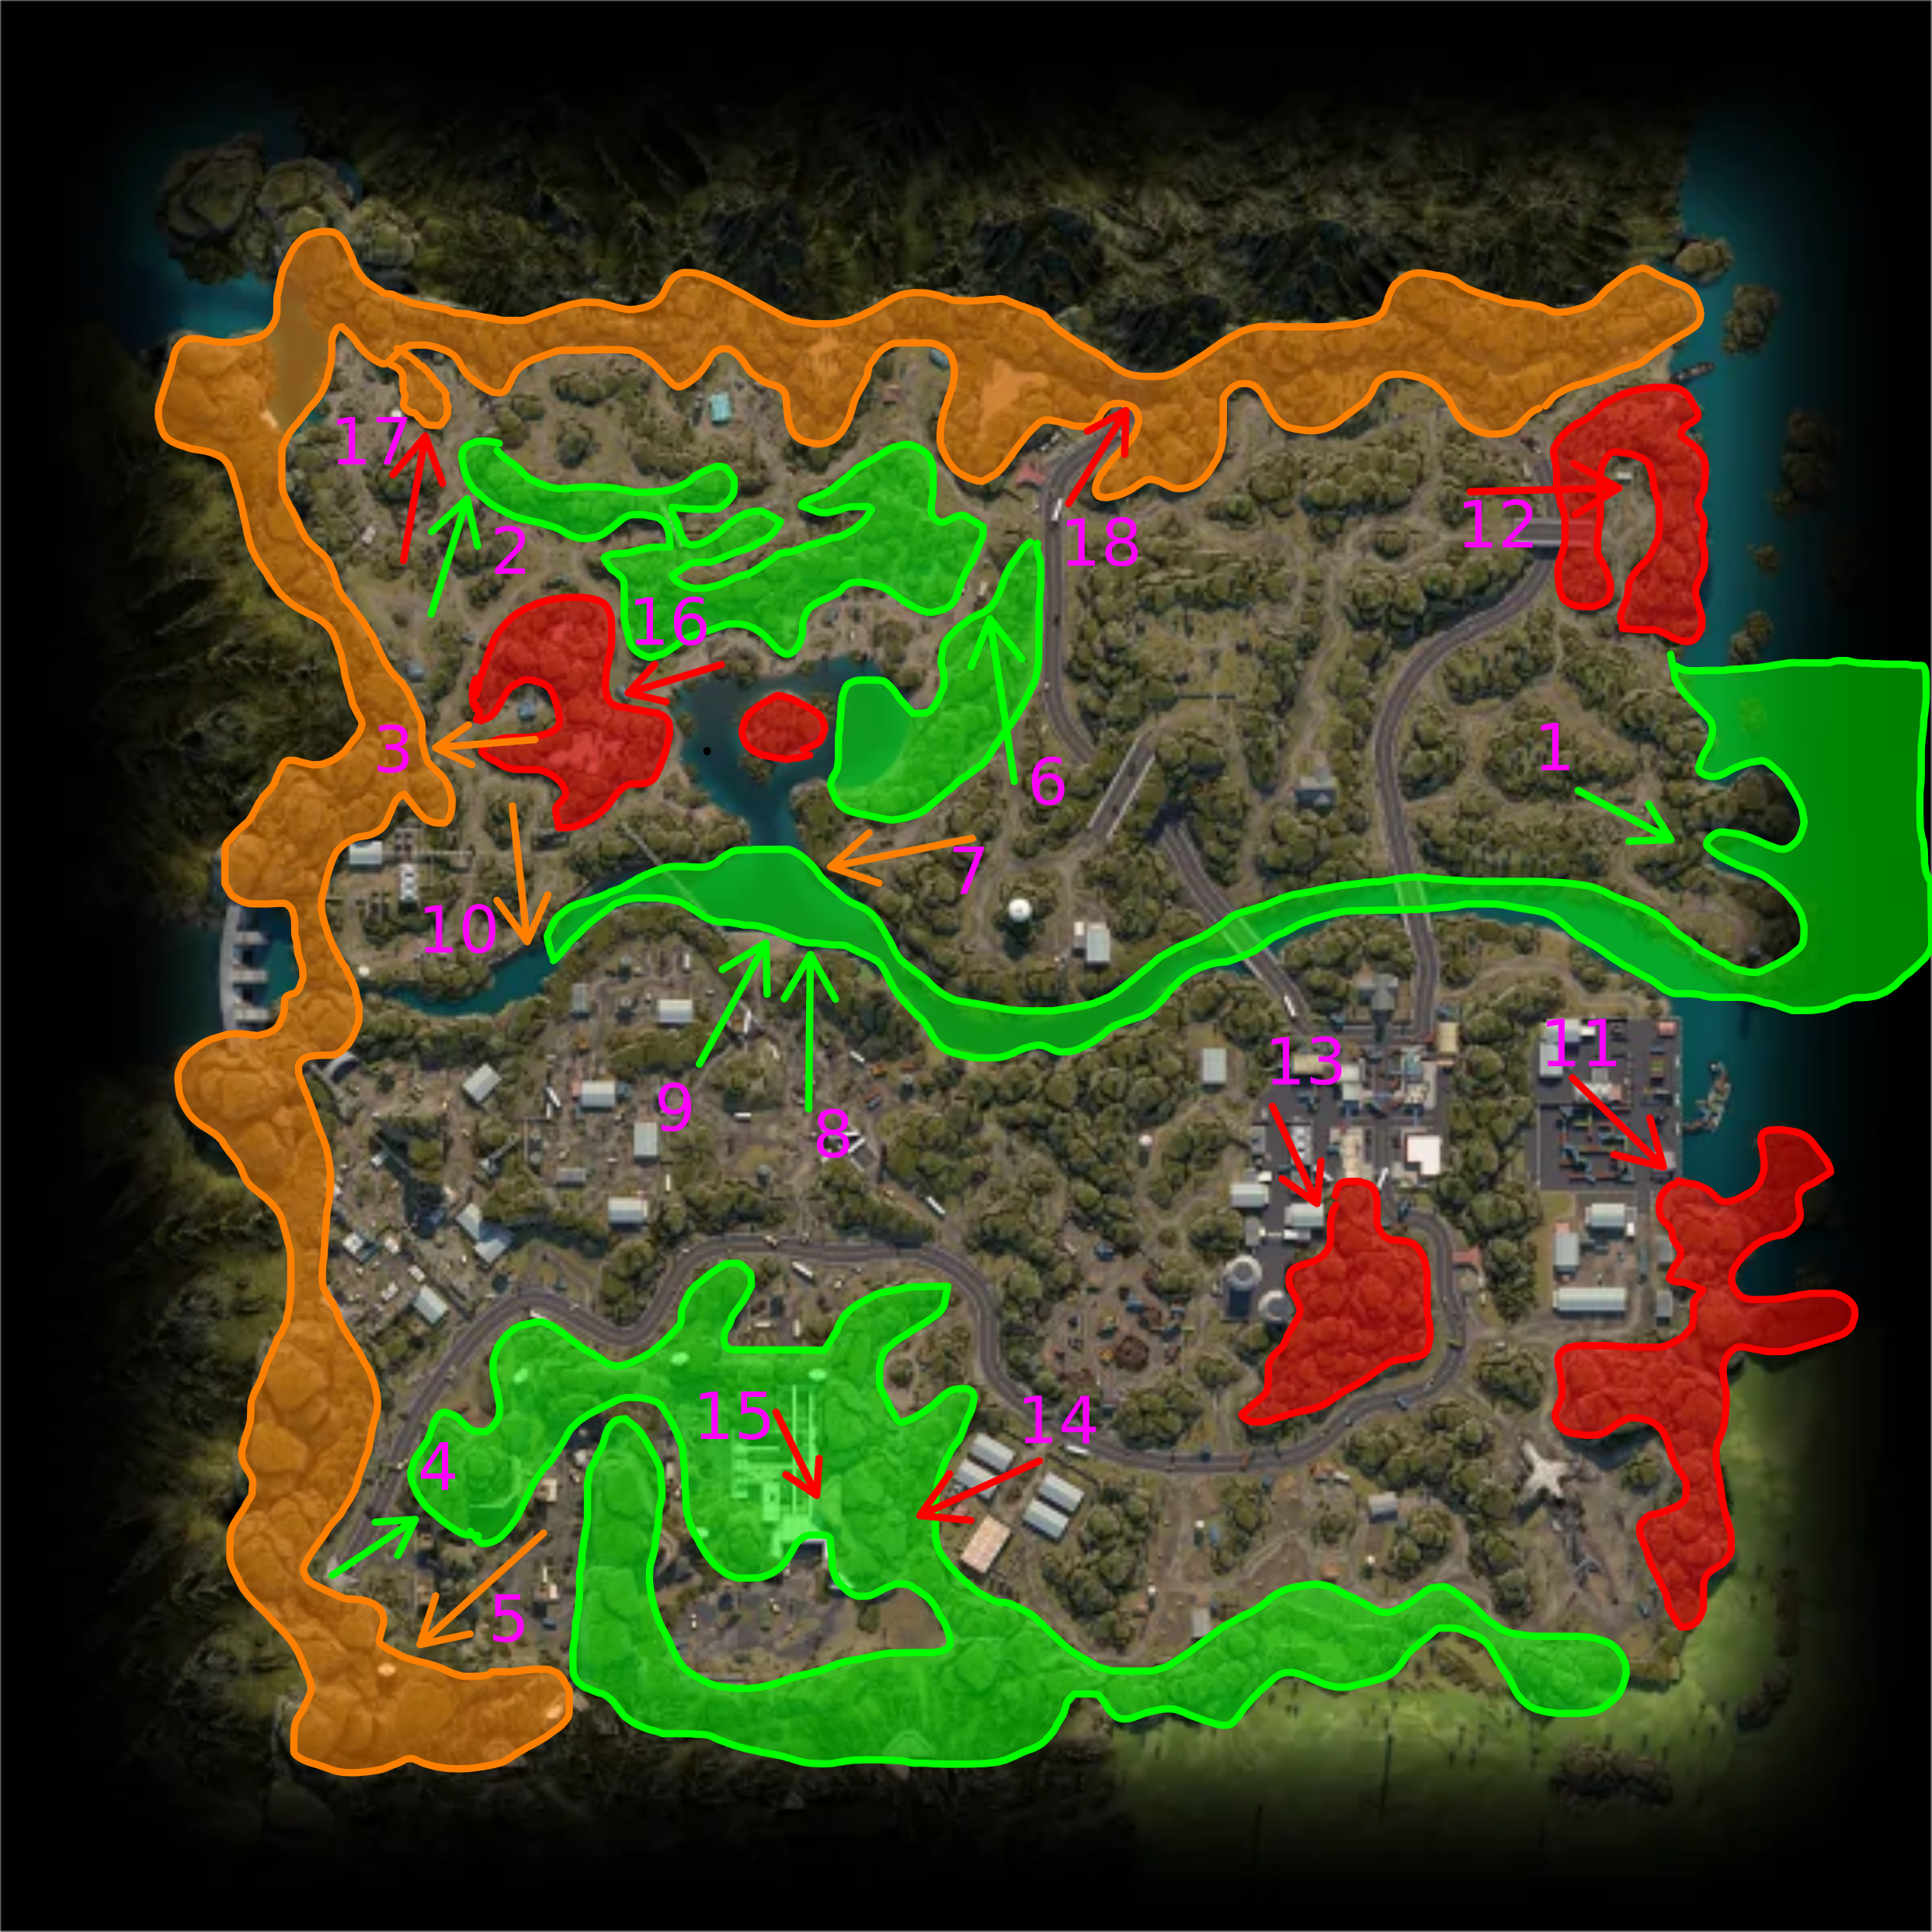
In numerical order:
1. in a tent by the arrow, there is a red folding chair. Do a floor clip using it and walk north, then turn right to escape
2. climb the tree to the right of Bill to "jump" on top of the invisible wall and escape. You can cross the wooden bridge from the outside to get to the other mountains to the south
3. this is very complicated, i'll try to add pictures soon. Looking in the direction of the arrow on the very top of the climbing spot. To your left, you should see a part of the mountain that you can not simply walk to and is not connected to a wooden plank. You must use the last wooden plank to gain height and jump on top of it. From there, hug the right wall to get past the invisible wall. once you escape, go to the left wall and walk all the way west to where you will think you are stuck. you can climb the wall by putting your head into the wall to do a glitch climb, start it just before touching the fake mountain that has no collision. Once you get up, going south is free, going north you can either do a recetner to get past the wall, or jump off the side of the mountain and campfire climb once you walk more farther north
4. There is a missing invisible wall here, start from the left of the arrow, and climb directly up the thing supposed to block you. You should be able to get to the white concrete building to the right of the arrow. Once you go inside, there is a wall blocking you from going north. climb on the left rock, and get to the very far left corner, touchign the wall. Once you do that, turn around, there is a spot where you can do a floor clip. Once you do that, you are inside the thing blocking you so you can escape.
5. starting from the first plank of the climbing spot, facing the arrow, you will see there is an invisible wall blocking you. Go to the right to walk around. You must use campfire abuse to continue north, clipping or climbing will work.
6. climb the tree as with #2, and jump over the invisible wall. to get to the center island in the middle of the lake, use campfire abuse to clip through the invisible wall stopping you.
7. under the pipe, go to the edge of the water. There is a type 2 misalignment you can teleport in to get out of bounds. Switch to free movement, go into the water.
8. not a big area, but usefull because it's a shortcut. crouch super low to get past the white pipe, and then stand up. If you do a floor clip, just try again, it should put you on the bridge in a few trys. if nothing happens at all, you didnt crouch low enough to walk past the white pipe.
9. this is the other side of the pipe. In contrast to #8, you can not get past it because the red and white pipes are swapped. There is a type 1 misalignment to get through the red pipe, and crouching low enough gets you past the white pipe.
10. to cross this bridge, go to the right side of the bridge. get under the crate and then stand up. Instaid of a floor clip, for whatever reason this specific spot makes you climb on top of the crates. from here, cross and use teleportation to get out the other side. this trick would be green, but I chose orange because it is inconsistent. Most of the time it works within about 5-10 tries, but sometimes you just have to give up. If someone can figure out a reliable setup for this, it would be green.
11. this is the most difficlt to explain. before going to the arrow, to the north of this spot is a hanging shipping container, use it to floor clip. The first step is to stand up, and then crouch (this sets up your height to a consistent value). Do not crouch in real life yet. Going south to the arrow, you will see that a decrative concrete wall slightly extends below the floor. when you walk, you will find that you hit your head on the "roof" and cant go there. Now, duck your head just barely enough to get to the other side, you should be touching the right side of the pillar. From here, uncrouch and crouch (in game, not in real life) do not spam bac and forth, flick your joystick up, and then down, and then stop. you should now be through the floor on a very unstable platform where you will fall easily. You can either run forward to jump to the marked area, or use a recenter. you will need campfire climbing to get everywhere.
12. floor clip under the red wooden deck/porch of the blue house. This is red because it's hard to climb on the mountain.
for brevity: 13, 14, 15, 16, 17, and 18 are all climbing spot levitation.
13. there are 2 steps, get on the big building the arrow is on, and then use a recenter to dash into the highlighted area.
14. get over the invisible wall to the west.
15. get on top of the roof of the white building of the military base
16. get over the invisible wall to the west. this one, you can get stuck often before getting to the mountain. teleport/fast travel, and try again.
17. get over the invisible wall to the north. You can then escape to the northern border.
18. slightly special in that you arnt getting over the invisible wall, get high enough over the visible mountain to escape.